I had originally mounted Intuitive Race Products frame sliders directly on the top
engine mount bolts. These were units converted from Honda CBR600F sliders since Intuitive Race Products did not make sliders
specifically for the bike at that time. I had simply sawed off the smaller diameter protrusion from one of the sliders.
Longer (6 inch) stainless 3/8" bolts and washers replaced the stock bolts to accommodate the extra length required.
The set of sliders I received were of different lengths. I placed the longer one on the right side since the
engine/transmission protrudes farther out on that side.
European dealers do offer sliders mounted on brackets that are then mounted on both engine mount bolts. Seeing how much better
this looked on photos of European bikes, I was pleased when Steve Wells designed custom brackets using 1/4" aluminum
stock. I thank him for generously providing me with a set.
I painted the aluminum brackets using Testor's metallic silver model paint and then covered them with a clear coat.
Painting on aluminum is difficult however and there's no telling how long this will last.
The existing modified Honda sliders were themselves mounted onto the brackets using 3/8 x 2 1/2
SAE grade 8 bolts. On each bolt I placed a lock washer, 2 flat washers, the slider, another flat washer, the bracket, a 1/4"
nylon spacer in the .813" hole, a large flat washer, and finally, a 3/8 nut.
I went back to the stock engine mount bolts. The top ones are a little short so it's especially critical to tighten them to
the specified torque values and then recheck them after riding.
The top engine mount bolt (M10) should be tightened to 40 lb-ft, 55 Nm.
The lower engine mount bolt (M8) should be tightened to 24 lb-ft, 33 Nm.
When mounting the brackets with the sliders already mounted and tightened on them it is critical not to remove
more than one engine mount bolt at any one time. If you do, it will be very difficult to replace the bolts
afterwards.
When removing or replacing the top engine mount bolt on one side I inadvertantly dislodged a metal spacer in the
mount assembly. The bolt will go back on and even torque properly without this spacer but a strain is then placed on a
thin metal cap which is not designed to hold it. Be careful here.
Since I did all this, Intuitive Race Products has developed sliders for the
bike that are mounted on brackets similar to the ones described here. The price is $99. The brackets seem to
place the slider a bit lower than the ones described here so, when ordering, the short slider is recommended for additional ground
clearance during high lean angle turns.
Update:
This picture demonstrates the value of sliders. That damage could have been done instead to the frame and engine casing.
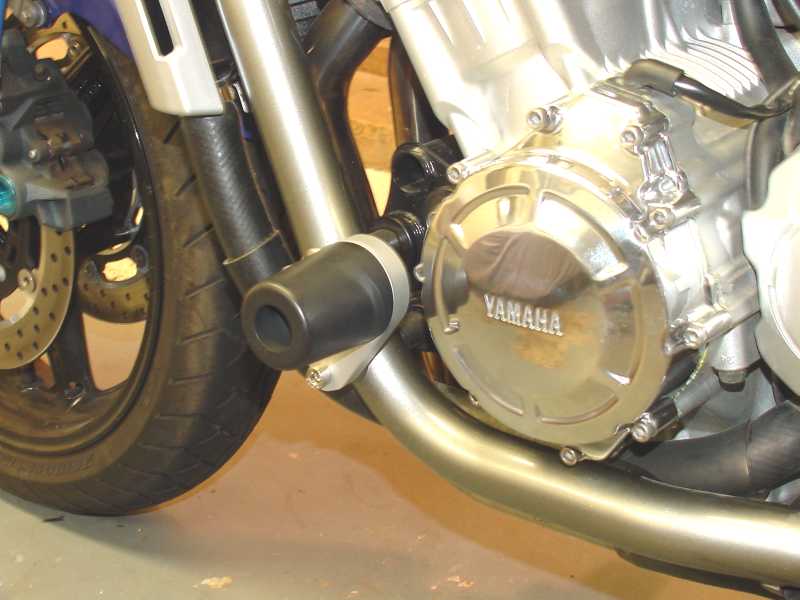
I got a set of beautiful sliders on custom brackets from Jarzyna (Peter K.) of the Owners Association. These have the bike's logo emblazoned
on them with a wire EDM. They are thicker so as to resist the bending of the previous slider bracket.
These sliders require longer engine mount bolts. One excellent source is
Metric Specialties. The 125 mm length is the minimum recommended for the
M10 bolts. Because of the thick sliders, any shorter and there would be no additional thread extending beyond the nut.
Here is what they look like mounted on the brake side.
And on the shifter side.
The front view.
Update II:
An unfortunate lowside tested the function of the new sliders. The slider did it's job and saved the critical
engine and frame components from catastropic damage. The slider did absorb most of the damage.
The thick bracket did not bend at all but the stainless bolts did.
Unfortunately, the custom sliders have a custom conical shape. I was able to fabricate a hand-made replacement from a length of
raw Delrin® rod from Professional Plastics. This is a black 2 1/4" diameter
Delrin® Acetal Homopolymer rod, $22 per foot in this size. I had to cut a length of 2 1/2", drill a 7/16" hole through the
center with a 7/8" countersink for the attachment bolt. The hard part was trying to match the conical shape of 2 1/8" diameter
on one end and 1 7/8" on the other. Some time on a belt sander did a decent, but not perfect, job. Lastly, some rounding, fine sanding,
and polishing finished it up. If you don't look too closely it's ok.
Alternative:
An excellent alternative to the custom sliders are the commercially available Moko Sliders from Germany. These
can be purchased from Wild Hair Accessories for $140.
Last Updated: 02-26-2005
Copyright © 2001-05, Patrick Glenn, All Rights Reserved.
Yamaha® and FZ1® are registered trademarks of the Yamaha Motor Corporation.
This site is not affiliated in any way with the Yamaha Motor Corporation.
The information presented here reflects solely my personal experience with my motorcycle and is presented
for entertainment purposes only. No information presented here is to be relied upon for issues of rider safety
nor to replace the services of a qualified service technician.
Any attempts to follow or duplicate any of these procedures are done so completely at your own risk.
By reading the information on this site, you agree to assume complete responsibility for any and all actual
or consequential damages that may arise from any information presented herein.


