The Factory gearing is very tall. Highway speeds in the high gears produce very low engine speeds. Perhaps too low for brisk acceleration for passing or emergencies without downshifting. Also, it really isn't necessary to be able to go 75 mph in 1st gear. Installation of a smaller 15-tooth versus the stock 16-tooth front sprocket provides a modest increase in the final drive gear ratio from 4.348 to 4.638. This has the effect of slightly increasing the engine rpm at all speeds in all gears.
primary reduction ratio = 68 / 43 = 1.581 (internal transmission gears)
secondary reduction ratio = 44 / 16 = 2.750 (44 = teeth on rear sprocket, 16 = teeth on front sprocket)
Stock final drive ratio = primary reduction ratio x secondary reduction ratio = 1.581 x 2.750 = 4.348
Modified final drive ratio = 1.581 x (44 / 15) = 1.581 x 2.933 = 4.638 (15 = teeth on smaller front sprocket)
| Speed (mph) | 1st Gear | 2nd Gear | 3rd Gear | 4th Gear | 5th Gear | 6th Gear |
|---|---|---|---|---|---|---|
| 20 | 3000 / 3200 | 2200 / 2400 | 1800 / 1900 | 1600 / 1700 | ------ / 1500 | ------ |
| 30 | 4500 / 4800 | 3300 / 3600 | 2700 / 2900 | 2400 / 2600 | 2200 / 2300 | 2000 / 2200 |
| 40 | 6000 / 6400 | 4400 / 4700 | 3600 / 3900 | 3200 / 3400 | 2900 / 3100 | 2700 / 2900 |
| 50 | 7500 / 8000 | 5500 / 5900 | 4500 / 4800 | 4000 / 4300 | 3600 / 3800 | 3400 / 3600 |
| 60 | 9000 / 9600 | 6600 / 7100 | 5400 / 5800 | 4800 / 5100 | 4300 / 4600 | 4000 / 4300 |
| 70 | 10500 / 11200 | 7700 / 8200 | 6300 / 6700 | 5600 / 6000 | 5000 / 5400 | 4700 / 5000 |
| 80 | ------ | 8800 / 9400 | 7200 / 7600 | 6400 / 6800 | 5700 / 6100 | 5300 / 5700 |
| 90 | ------ | 9900 / 10500 | 8000 / 8600 | 7200 / 7600 | 6400 / 6900 | 6000 / 6400 |
| 100 | ------ | 11000 / ------ | 8900 / 9500 | 7900 / 8500 | 7100 / 7600 | 6600 / 7100 |
 |
 |
At all road speeds, the engine operates at higher rpm's where more power is available for better acceleration. Also, because of the torque multiplication effects of transmission gearing, the modified gear ratio has the effect of increasing the effective rear wheel torque by a computable amount:
Rear Wheel Torque with Smaller Front Sprocket = Rear Wheel Torque with Stock Sprocket x (16 / 15), or, a 6.67% increase.
Note that this does not theoretically increase the power at the rear wheel. At each engine rpm the shorter gearing increases multiplied torque at the wheel but also decreases the wheel rpm in the exact proportion to maintain the identical power value. This is also not a reference to the 'Rear Wheel Torque Curve' which is a measure of the engine's ability to deliver torque to the rear wheel independent of the torque multiplication effects of the transmission.
The smaller sprocket is, however, lighter in weight and thus has less rotational mass to accelerate. The reduced transmission power losses due to this factor are probably very small.
Fuel economy will be reduced by about 5-6%
A Theoretical Performance Comparison Table is Shown Here.
The smaller sprocket costs about $35 and is available from Sprocket Specialists, Part #556-15 for the 530 chain.
Due to the way that the speed sensor is used to compute road speed, by measuring the countershaft rotational velocity and using the known stock secondary reduction ratio and rear wheel size to convert that to miles per hour, a speedometer error reading high by 6-7% will be introduced. This is in addition to any existing stock speedometer error.
Another option would be to install a larger (more teeth) rear sprocket. You would have to go up three teeth on the rear (from 44 to 47) to match the one tooth decrease on the front to achieve the same final drive ratio increase. Rear sprockets are a bit more expensive at about $60. Also, the stock chain is too short for the 47 tooth rear sprocket and this option would require a longer chain. Of course, nothing says that you can't change both the front and rear sprockets to achieve the characteristics you want.
Another consideration is that installation of a smaller front sprocket will necessitate a small increase in the bike's wheelbase to maintain proper chain tension (in my case by about 5 mm). This will reduce the tendency of the bike to wheelie under acceleration although this is overwhelmed by the increased acceleration potential. A larger rear sprocket will reduce the wheelbase and increase the wheelie potential even more.
A smaller front sprocket may also increase wear on the plastic chain guide on top of the swingarm due to the decreased clearance between the chain and the guide.
Lastly, there is some thought that the smaller front sprocket will increase chain wear due to the chain bending more sharply to traverse the sprocket teeth of reduced radius. A larger rear sprocket will decrease chain wear for the opposite reason. These effects, however, have never actually been quantified.
Installation:
Place bike on Centerstand
Remove Left Side Footpeg
Remove Drive Sprocket Cover
Loosen Drive Sprocket Nut
Loosen Rear Axle
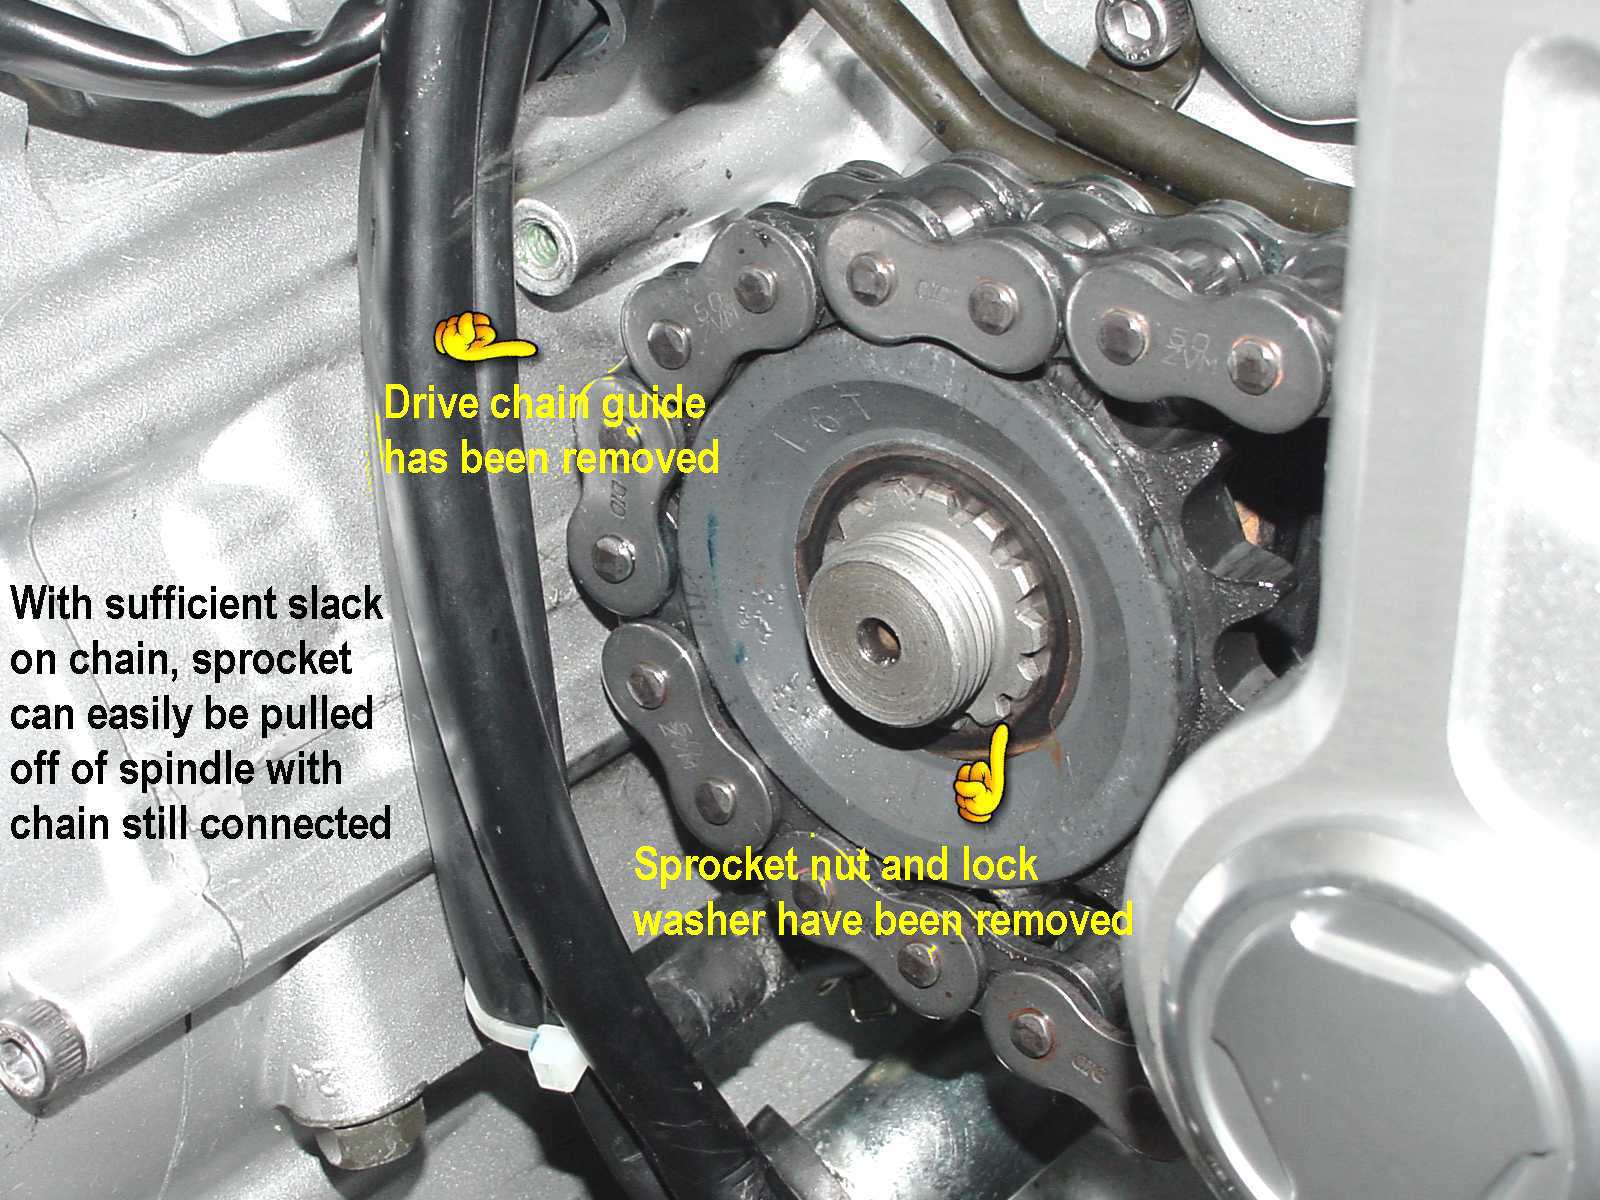
Remove Stock Front Drive Sprocket
Install New Sprocket
Next, remove any wheel blocking device and adjust the drive chain slack.
A page describing that procedure is here.
Check Your Work
Subjective Riding Impressions:
I replaced the stock plastic sprocket cover with a silver anodized Billet Aluminum cover
designed and manufactured by Frank Mill (RoadDog). It is also
available in unfinished aluminum for polishing or anodized black. Please visit
pjsparts.com or email
Mike Pijanka for price and availability. Mike is also a representative for
excellent Rizoma accessories.
The stock cover can be removed by:
Install the cover by inserting the top bracket in place then insert the sprocket cover and attach to the bike with the three
bolts. The longest (85 mm) bolt gets the tube spacer and screws into the bottom right empty screw hole. The bottom left screw hole
is left empty. The shortest (35 mm) bolt fits through the cover, through the bracket, then into the top screw hole for the
chain guide. The middle length (50 mm) goes into the top right cover screw hole. The top left cover screw hole is left empty.
All the hoses route in front of the sprocket cover.
Installed pictures:
Last Updated: 01-22-2004
Copyright © 2001-03, Patrick Glenn, All Rights Reserved.
The information presented here reflects solely my personal experience with my motorcycle and is presented
for entertainment purposes only. No information presented here is to be relied upon for issues of rider safety
nor to replace the services of a qualified service technician.
Any attempts to follow or duplicate any of these procedures are done so completely at your own risk.
By reading the information on this site, you agree to assume complete responsibility for any and all actual
or consequential damages that may arise from any information presented herein.


1600 x 1200
1600 x 1200
1600 x 1200


1600 x 1200
1600 x 1200


1600 x 1200
1600 x 1200
1600 x 1200
1600 x 1200


1600 x 1200
1600 x 1200
1600 x 1200
1600 x 1200


1600 x 1200
1600 x 1200
1600 x 1200
1600 x 1200


1600 x 1200
1600 x 1200
1600 x 1200

1600 x 1200
Addendum:


1600 x 1200
1600 x 1200


1600 x 1200
1600 x 1200

Back to Main Page
Yamaha® and FZ1® are registered trademarks of the Yamaha Motor Corporation.
This site is not affiliated in any way with the Yamaha Motor Corporation.