
The engine is, of course, the primary source of vibration on the bike. Over time or due to factory variations the engine can get slightly out of alignment on the mounts and generate additional vibrations. Sometimes re-torquing the bolts that secure the engine to the mounts can bring it back into alignment and reduce vibrations. The procedure is to loosen the bolts, run the engine briefly, then re-torque the bolts. There are four main mount bolts, left and right front, upper rear, and lower rear.
Here are some tools that you will need. Not shown are sockets or allen wrenches to remove the frame attachment bolts if slider brackets are in the way. If you do not have slider brackets then loosening those four frame mount bolts is optional and may or may not provide any additional benefit. Also not shown is the torque wrench.
|
| 1600 x 1200 |
Place Bike on Centerstand.
Loosen the front mount bolts first. I do have sliders on brackets that impede access to the front mount bolts. The bolts that attach the slider brackets also attach the front engine mount bracket to the frame. I loosened the top bolt, removed the bottom bolt, swiveled the slider bracket out of the way, then replaced the bottom bolt temporarily. Do this procedure completely on one side then the other.
 |
 |
 |
 |
| 1600 x 1200 | 1600 x 1200 | 1600 x 1200 | 1600 x 1200 |
This shows the two front mount bolts. Loosen them so that they are free to move just slightly in place.
 |
 |
| 1600 x 1200 | 1600 x 1200 |
Next, loosen the rear top mount bolt. This is a long bolt that runs the width of the engine. The head is on the left and the retaining nut is on the right. You will need to hold the nut while you apply force to loosen the bolt. It is on tight and creaks as it is loosened. A deep 14 mm socket would have been useful here to hold the nut on the right but I was able to cheat a bit and not plug in the 6" extension all the way into the socket and gained just enough clearance to hold the nut securely without fear of rounding it.
 |
 |
 |
 |
| 1600 x 1200 | 1600 x 1200 | 1600 x 1200 | 1600 x 1200 |
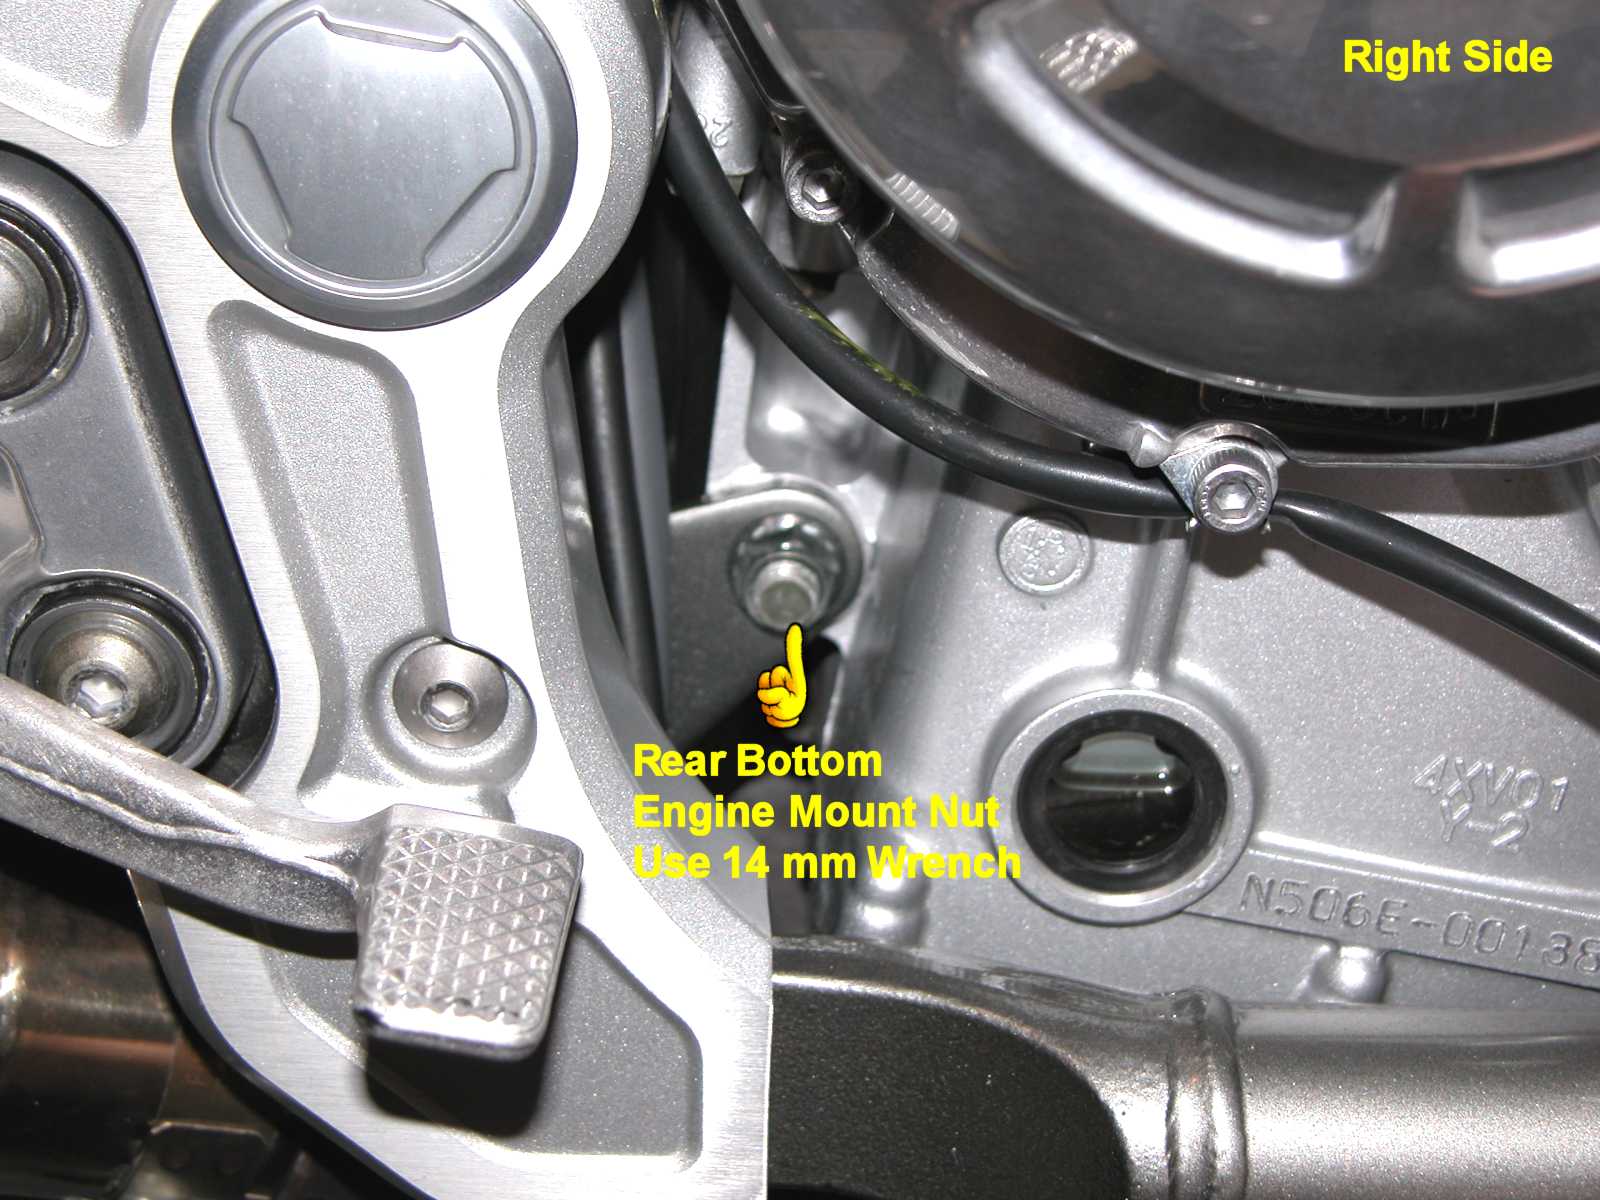
Next, loosen the rear bottom mount bolt. This is also a long bolt that runs the width of the engine. The head is on the left and the retaining nut is on the right. You will again need to hold the nut while you apply force to loosen the bolt. It is also on tight and creaks as it is loosened as well. The nut on the right is close enough to the end of the bolt here so the 14 mm socket fits well over the nut here.
 |
 |
 |
 |
| 1600 x 1200 | 1600 x 1200 | 1600 x 1200 | 1600 x 1200 |
Next, with the all the mount bolts free to move just slightly in place, start the engine (transmission in neutral) and rev it a few times to 3000 rpm then shut it down.
If you have slider brackets, swivel them back in position removing and replacing the bottom M8 bolt. If the bottom bolt doesn't easily pull out it can be slowly unscrewed out.
Re-torque the mount bolts in this order. You will need to hold the nuts again as you torque the bolts.
The service manual lists the Frame Attachment bolts before the Right/Left Front Mount bolts but this is not possible because of the slider brackets.
For the front M10 bolts, a regular 14 mm flat wrench can hold the nut as you torque the bolt. The bottom frame mount M8 bolts take a 13 mm wrench to hold the nut.
My main issue with vibration is an annoying resonance I feel in the seat at 6500 rpm. This is due to the solid rubber feet on the Corbin Seat which press directly onto the frame and do a miserable job of damping any vibrations. A couple of things I have done, installing the Carburetor Equalization Manifold and doing Ivan's Dynamic TPS Adjustment in addition to installing Ivan's jet kit have helped alot but I was hoping to dial this out completely. On my first ride after this re-torquing I was initially disappointed as that 6500 rpm vibe was still there but as the engine warmed it seemed to subside and became nearly undetectable aside from a little roughness. We'll see as time goes on whether or not this re-torquing has any lasting effect. You may indeed wish to give this a try if your vibe conditions are excessive or intrusive.
Addendum:
From yamahablue:
"I just removed the engine from my FZ and found a potential problem. The top rear engine mount bolt was corroded
and almost seized up in the engine case. The reason, dissimilar metal corrosion. ie: steel against aluminum.
This is a big no no unless the bolt is properly plated with a resistant coating. This bolt obviously was not plated
very well and corroded terribly in the bike's short 1 year life span. There is no doubt that, if gone unchecked,
the bolt would have failed in a couple of years. I will have to replace the bolt and clean the engine case well
to prevent any further deterioration. The bottom bolt was properly treated and showed no signs of corrosion.
Here is a pic of both top and bottom bolts."
Addendum II:
From Bill Jinks, an improved procedure:
It is important to completely remove the "Rear Upper Through Bolt" as both Wyn and Yamahablue have
proclaimed that theirs were seriously corroded...and upon removal and inspection I can confirm their claims of
corrosion as...well....almost an understatement!!!
Pretty ugly eh???....Sooo...it was fire up the compressor and wire brush on a handgrinder time...cleaned her
right back up...dressed her out with some copper base anti-sieze...and back in she went.
And now...here's.... the things I did differently...How I did'em...& Y...
Thing #1.
After removing and dressing out that ugly corroded upper rear mounting bolt I proceeded to loosen the lower rear
mounting bolt and then I loosened..."Just The Two Through Frame Bolts" up front..but...not "BOLT #3" in the pic below..
The reason I didn't loosen "Bolt #3" is a simple one as...it has no "Floating Value"...it simply allows a vibration
dampening (through the rubber bush) attachment of the forward engine case mounting points to the actual forward engine
mounting bracket assy...which in and of itself is a "Hard Given Dimension"..with.."Zero Floating Value"....in other
words..you'd simply be loosening and re-tightening the bolts as..from what I can tell...there is no moving/floating
feature/value involved there...just a bolt going through a rubber lined bushing.
Thing #2.
After completely loosening the the "rear upper and lower through bolts" and....just the "through the frame/downtubes"
engine mounting bolts (bolts #1 & #2 in the pic above) on both sides...I didn't just start my engine....let it idle a
while and..rev it a few times to 3K rpms....I also...
Pulled in the clutch lever and gently snicked it into 1st and then "VERY GENTLY" permitted the clutch to engage
allowing the rear wheel to spin and the chain to "Find & Settle Into It's Most Linear Tracking Path" possible....while
at idle...never reving the engine...while...all the engine mounting bolts were dead loose and...I could almost hear the
chain find it's straightest path of travel as it aligned the front and rear sprockets and quieted down the chain tracking
noise considerably.
Afterwards I was amazed to find that...after I gently pulled in the clutch lever..while the engine was still running...with
the tranny still in 1st gear...the rear wheel kept right on spinning (until I reached over the bike and actuated the rear
brake with my right hand rendering the rear wheel motionless even after releasing the brake) but prior to that..it was as
though I had never disengaged the clutch!!!....and this told me that...my front and rear spockets were previously not in
perfect alignment with the chain path...and...now they were..effectively eliminating a very noticable amount of chain
drag/friction.
Thing #3.
I didn't re-tighten the mounting bolts per Mr. Glenn's recomended sequence for the following reason....
Reason: It's the forward mounting bolts #1 and #2 (noted in the pic above) that have "The Floating Feature"
incorporated into their design...which tells me that for the most part...it's the "front of the engine & mounts"
that biases engine postion...where...the rear mounting through bolts engage metal tabs welded to the frame...and...
if you tighten them first...you will most likely mechanically influence/shift the engine right back to the position
you started from as...the forward mounts (designed to float) are...well..still loose and.."FLOATING".
So to me the thing to do was...
a. Leave the rear through bolts generously loosened and...Re-Tighten The Floating Forward Mounting Bolts
First!!!...starting with "BOLT #1" (the lower forward through frame bolt with the smaller 12mm head in the
pic above)...first snug each one...then torque each one...on each side..sequentially so as not to disturb the
engines new found proper position. Then....
And now...I do know this...even if the shop manual says differently...my best mechanical
instincts and the reduction of chain/spocket noise and drag/friction tell me that...I just did everything right.
Addendum III:
From Wally Hartung, an aluminum industry metallurgist, warning about using a copper-based anti-sieze.
In a galvanic corrosion situation involving aluminum and steel, we're not worried about the steel. The aluminum is the
sacrificial metal and will corrode preferentially, protecting the steel. The presence of water is absolutely necessary
for the reaction to occur.
Plated steel bolts (plated with either cadmium or zinc) will afford some protection to the aluminum, but only as long as
the plating lasts. It's being used up as it sacrifices itself to protect the aluminum. As soon as the plating is used up,
the sacrifice of the aluminum parts to the steel will begin.
The white powdery coating on one of the bolts looks a lot like aluminum oxide. Guess what part is really getting eaten up.
That's right, the aluminum case.
Now if you want to really see aluminum go to pieces, get copper involved. Copper eats up aluminum in a situation of
dissimilar metals with water involved. Copper based anti-seize should NEVER be used in contact with, or where it can get
in contact with aluminum. Use the aluminum powder anti-seize, always.
My knee-jerk reaction recommendation to fix this corrosion problem would be to:
This is why I never use a pressure washer on a motorcycle, they'll force water into all kinds of places it's not supposed
to be. Also, never use a plain steel or brass(copper) wire brush on aluminum during the corrosion cleanup. Always a
stainless steel wire brush. Steel or copper based wire brushes will leave small particles and lead to pitting of the aluminum.
304 stainless fasteners are fine with in contact with aluminum. There is a surface passivation involving the chrome oxides
that form on the stainless that precludes the formation of a galvanic cell under most conditions.
Wally advises that by just looking at a couple of photos of one component of the problem he really can't offer a professional
opinion from such limited information. There may be other factors involved, but the basic premises of
keeping the water out and not using copper are sound.
Last Updated: 06-25-2004
Copyright © 2001-03, Patrick Glenn, All Rights Reserved.
The information presented here reflects solely my personal experience with my motorcycle and is presented
for entertainment purposes only. No information presented here is to be relied upon for issues of rider safety
nor to replace the services of a qualified service technician.
Any attempts to follow or duplicate any of these procedures are done so completely at your own risk.
By reading the information on this site, you agree to assume complete responsibility for any and all actual
or consequential damages that may arise from any information presented herein.

![]()


Back to Main Page
Yamaha® and FZ1® are registered trademarks of the Yamaha Motor Corporation.
This site is not affiliated in any way with the Yamaha Motor Corporation.