Adjustable footpegs add a degree of versatility to foot and leg placement. The pegs
can be adjusted lower for more leg room and comfort or higher for a more aggressive position
and greater ground clearance. Fore/aft positioning options are also provided.
These pegs are not foldable like the stock pegs and may serve
as sliders in the event of a crash. Race bikes use fixed pegs to guard against the possibility
of the foot being trapped between a folding peg and the chassis. Fixed pegs should grind down easily
if they contact the road surface and should not cause the feared 'jacking' of the bike that would result
if a peg were to touch down.
I installed the Lockhart-Phillips Super Pole V-360K Knurled
Adjustable Pegs, Part # 109-4920 in Silver. They also come in blue and hard-anodize.
The price of the pegs from Lockhart-Phillips
is $59.95. They are a little cheaper from
Arizona Motorsports at $53.96. The alternate milled pegs models (V-360M) are about $10 more expensive
(see the bottom of this page for a photo of these).
These are the installation instructions provided with the pegs.
To install the pegs the bike should be on the centerstand.
Remove Footpeg Assemblies from Bike:
Remove Shift Side Footpeg Assembly.
- Remove Shift Linkage Ball Joint Bolt
- Remove Footpeg Plate Bolts
- Pull Shift Linkage Rod Through Frame and Remove Footpeg Assembly
Remove Brake Side Footpeg Assembly.
- Remove Brake Pump Attachment Bolts.
- Remove Footpeg Plate Bolts.
- Disconnect Brake Light Switch Spring.
- Remove Brake Light Switch Phillips Screw and Bracket, watch how the bracket is positioned on the tab below it.
- Straighten and Remove Brake Pump Retaining Cotter Pin. Don't destroy it or you'll need a new one.
- Remove Brake Pump Connecting Pin and Washer.
Remove Stock Footpegs from Assemblies:
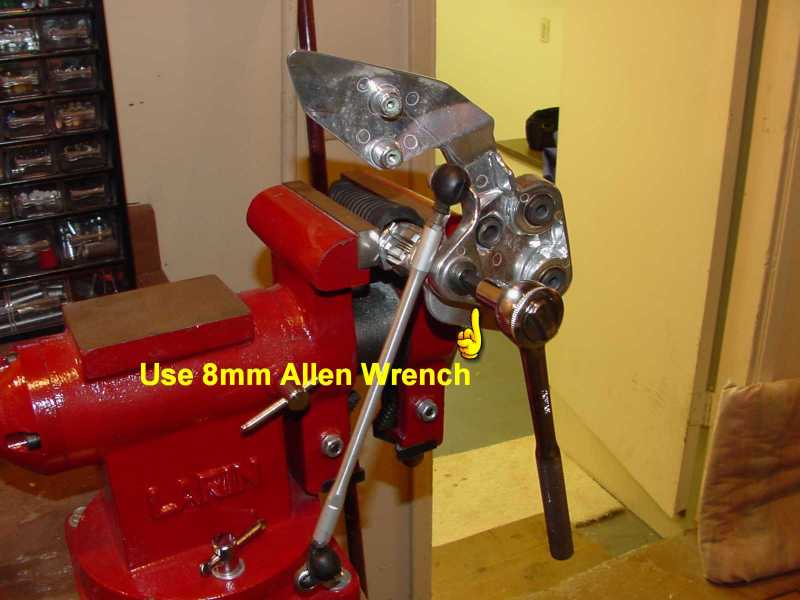
For both the clutch and shifter footpeg assemblies, place them in a vice and remove the 8 mm attachment
bolt (M10 thread). Don't lose the wave washer, you will need to reuse it.
Attach New Footpegs to Assemblies:
Apply a little grease to the bearings of the shifter and the brake.
The stock bolt is too long to work properly with the new footpegs. I used three spacing washers to reduce the length
inserted as it is screwed in to the new pegs. A 1/2" serrated lock washer is first, then two stainless washers.
The ID of the washers must be 7/16" to fit on the bolt.
Attachment of the new footpegs is easier if you disassemble them first. It is tricky to match the flat portions of
the two brackets, insert the wave washer, and hold the shift lever or footpeg in place as you try to install the
large bolt with the spacing washers. Try to minimize the rounding of the soft aluminum flat portion of the new footpeg bracket as you try
to hold it in place and turn the large bolt. Be careful to install the shift lever and brake pedal in the correct
orientation so it reinstalls on the bike properly. Tighten the bolt securely (55Nm, 40 lb-ft), use some loctite.
Reinstall Footpeg Assemblies :
Reverse the disassembly procedures to reinstall the footpeg assemblies. The bracket plate
bolts should be torqued to 30Nm, 22 lb-ft. Use a little blue threadblocker on the bolt threads for
extra security.
You may have to adjust the shift lever after positioning the
shift side footpeg to the desired position. Similarly you may have to adjust the brake lever
and stoplight switch after installing the brake side footpeg.
Adjusting the Pegs:
Use a 5 mm Allen wrench to remove the center screw and height adjustment bracket. Reposition the height adjustment
bracket on the center bracket with the many pins aligned for the desired height. There are twelve possible positions
for height and fore/aft positioning. Reinstall and tighten
the screw. The pegs rotate so that the knurled portion faces up. Loosen that screw with the same Allen wrench,
turn the peg, then tighten the screw.
Installed Photos:
These are my knurled pegs:
These are the milled pegs from another user:
Update:
Unfortunately, Lockhart-Phillips now reports this as a discontinued item. The reasons are unknown and it is
surprising as this was by all accounts a very popular accessory.
Last Updated: 03-21-2004
Copyright © 2001-04, Patrick Glenn, All Rights Reserved.
Yamaha® and FZ1® are registered trademarks of the Yamaha Motor Corporation.
This site is not affiliated in any way with the Yamaha Motor Corporation.
The information presented here reflects solely my personal experience with my motorcycle and is presented
for entertainment purposes only. No information presented here is to be relied upon for issues of rider safety
nor to replace the services of a qualified service technician.
Any attempts to follow or duplicate any of these procedures are done so completely at your own risk.
By reading the information on this site, you agree to assume complete responsibility for any and all actual
or consequential damages that may arise from any information presented herein.


